FAQ

Most Frequently Asked Questions

In addition to its looks, a curved projection screen plays a valuable role in today’s home theaters. Residential theaters are more commonly featuring the same wide “Cinemascope” screen format as one would see in a movie theater. This wider format looks

Each Elite Prime Vision® model number starts with the product series name. Followed by screen size (diagonal), screen aspect ratio, screen material and product

Although there are many manufacturers that cover a variety of retail and integrator sales channels, product quality, features and pricing are still the driving criteria for increased projection screen sales.

Curling is commonly caused when a non-tensioned screen is in a room temperature below 65°F, but will maintain a relative state of flatness between 65-85°F (18.33°C-29.44°C). Curling does not distort the image, but for those interested in reducing side curls, Elite Prime Vision® offers “FG” or a fiberglass-backed material that greatly reduces curling.

Yes, but it should be done by a qualified installer following the detailed instructions from the screen’s manual and only on those models which specify extra black drop (i.e. E-20). In all other cases your screen’s top black border has been set to deploy to its full extent.

Yes, the Aerie Tension Series screen can be installed from above or below.

We strongly recommend using either a standard surge protector or a power conditioner on all electric projection screens.

The reasons why a customer would prefer the slower synchronized motor over the tubular is as follows:

  • The synchronized motors are silent. Many consumers prefer that all of their home theater gear operate silently.
  • The synchronized motor consumes considerably less power per operation than a tubular motor making it more of a green-conscious product.
  • Because the synchronized motor is produced at a lower cost than the tubular motor, we can forward the savings on to the consumer by providing a more aggressive price point.
  • Because of its slow speed, the synchronized motor generates less heat allowing it to enjoy a long operational lifespan.
  • Lastly, the synchronized motor has a drop speed that is roughly equal to a projector’s power cycle.

ALL EPV® screens use tubular motors.

Yes, EPV® electric screen products are compatible with Harmony and in their database.

Please visit the Harmony website for further assistance with programming your remote with our electric screens.

It depends entirely what your intentions are but here are the general format uses to help you out.

  • 1:1 format: If you use traditional Slideshow/OHP (Overhead Projector), Document Camera, and commercial projector presentations. These are most commonly used in schools, government facilities, and houses of worship.
  • 4:3 NTSC format: PC software, Commercial Presentations (if your projector is SVGA or XGA native resolution), Classroom Training, and Gaming.
  • 16:9 HDTV format: Home Theater Movies and Gaming
  • 16:10 format: PC software, video games, video editing, presentations from notebooks with WXGA or WUGA native output.
  • 2.35:1 Cinemascope format: Strictly Home Theater movies.

The best way to do it is to make sure the screen’s diagonal size matches the distance to you first row of seating. There are no set standard sizes for a room; however, consider the seating location of you and your guests. The screen should allow everyone to comfortably sit and watch without craning their necks back or shifting their eyes from side to side. Generally, 84″ – 106″ diagonal sizes are appropriate for your typical residential setup.

Although the sky’s the limit when it comes to getting a home theater projector, there are 3 basic qualities that define the typical mainstream consumer product.

  1. Price point is at or below $4,000 USD
  2. Your Projector’s Contrast Ratio is higher than 2500:1
  3. Your Projector has a 16:9 (HDTV) Native Aspect Ratio

Matte White is the most widely used material because of its superior versatility and it is recommended over high gain or contrast gray surfaces. It has wide diffusion uniformity for maximum visibility and will get satisfactory results with virtually any front projection array. It is recommended over high-gain material because high-gain concentrates the diffusion into a narrow viewing cone with sharp color enhancement which is great for a dedicated home theater environment but not preferred for a multi-purpose room due to its limited visibility angle. Contrast gray material enhances black level contrast for older DLP and entry level LCD projectors but also does this at the expense of diminished light return which means it should be used only with high output projectors.

Front projection should generally be used in a setting with controlled lighting or no ambient light at all.

For the best possible results, an anamorphic lens is recommended. However, it is possible to get a 2.35:1 screen format as long as you can live with the “black bars” created when a mismatched 16:9 native aspect ratio projector is set up to fit a wider projection screen format. It is simply a matter of personal preference.

Here are the instructions on how to adjust the rise and drop of your EPV® electric screen.

Please click on your screens’ series from the following list below.

  • PowerMax Pro 2/ PowerMax Tension / PowerMax Sonic Series
  • Peregrine Tension Series
  • Aerie Tension Series
  • PolarMax Series
  • EPVMax Series

The AcousticPro 4K performs at its best in a light controlled environment, not in a room that will have ambient light. The material is a fabric with a special weave pattern for projection use. It is suggested to go with our standard CineWhite® 2 material if a matte white screen is needed. Or better yet, our very best ISF Certified ChromaWhite material will perform better with 1.25 gain and accurate color fidelity.

Your serial number can be found on both ends of the packaging box stickers, as well as on the screen itself. Reference the list below on where to locate your serial number depending on the type of screen:

  • Manual Screens –> end cap and weight bar
  • Motorized/Electric Screens –> end cap and weight bar
  • Tripod Screens –> rear side of casing (left hand side)
  • Fixed frame Screens –> rear side of frame (bottom frame)
  • Yard Master Screens (Folding Frame) –> rear side of frame
  • Floor Pull up Screens –> end cap
  • Yard Master Sport –> weight bar

How to Choose the Correct Projection Screen

Fixed Frames are typically used in a dedicated home theater room or in rooms that have the space that allows a screen to be on permanent display. Because of their relative low cost and ease installation, fixed frame projection screens are most commonly used in media rooms.

Many people are using SVGA Projectors for videos and gaming with good results. Here are some ideas for selecting your Projection Screen.

Step 1: Choose a screen that is somewhere between the $100 to $400 price point (excluding size factors). As a rule of thumb, try to keep the cost of your screen to about 30% of your projector’s cost for the sake of proportional spending.

Step 2: Choose a 4:3 or 16:9 format screen, depending on how much time you will be involved with TV, gaming or movies that have various formats from 4:3, 16:9, and 2.35:1.

Step 3: MaxWhite® FG or CineWhite® 2 is the best choice for you. But you may also consider a high contrast gray material to improve your black levels if you are watching presentation with an SVGA projector with a low contrast ratio at about 2000:1 with a high output that exceeds 1500 lumens. Contrast gray is primarily used to improve black levels but the diminished light return should always be considered.

If you plan on watching high-definition television more than movies, you should plan on getting a 16:9 screen, which is the native aspect ratio of most projectors for home theater.

If you are more the proverbial movie buff, then you might consider a 2:35 to 1 widescreen, which is the aspect ratio of most Blu-ray discs. If you go with 2:35:1 screen, you’ll need a projector or video source that can handle the different aspect ratios by maintaining a constant height on the screen, or use a panamorphic lens.

Most home theater rooms allow the speaker placement below and to the sides of a screen. This allows you to choose a screen for the best video versus speaker placement.

If you have to (or choose to for aesthetic reasons) place speakers behind the screen you will need to choose an acoustic transparent screen, otherwise you can experience light loss and compromised image quality.

Acoustic Transparent screens, like EPV®’s award-winning AcousticProA4K, have an extremely tight weave and zero moire (rainbow artifact) performance that brings near-matte white performance.

The seating area distance from the screen is the key question for choosing what size screen you can put in the room. Most people are most comfortable viewing images from about 1.5 to 2 times the screen width.

The most common mistake we see in choosing a size screen is that there is a tendency to choose too big a screen for the room.

If you have good light control in a room or will be typically using the screen in a dark setting or at night, a 1.0-1.1 gain, matte white screen is a good choice.

If you prefer to use your screen in brighter environments with more ambient light, you will want to look for a higher gain screen, such as a gray screen to boost contrast levels or even select an ambient light rejecting screen, which offers excellent performance in even daytime ambient conditions

Elite Prime Vision® offers a screen for virtually every application and in enough options to satisfy all viewing preferences. EPV®’s screens are also priced to be among the most competitive screens in the industry. Whether you want fixed-frame, motorized, curved and application screens, EPV® has one that will fit your room and your budget.

We offer the best frames (3.5” thick aluminum, heavy velvet-coated), best screen materials, robust, tubular motors on the electric product and an industry best limited-lifetime/5-year warranty respectively on the fixed-frames and motorized screens.

Most ultra-short throw projectors despite claiming they can go up to a certain size, if they have a focus adjustment should be able to adjust the picture to 103” (if a 100” UST projector) or 123” (if a 120” UST projector) and fill in the entire screen area.

In some cases, certain UST projectors that have a fixed focus lens can go up to 103” and 123” with minimal impact on the picture and allowing to fill in the screen size.

Twilight Wireless Projection Screens

The RF remote is not rechargeable and requires one button cell CR2032 battery.

When charging the battery, the light on the charger is RED. The light on the charger will turn GREEN to indicate it is fully charged.

It takes 2 ½ hours to fully charge the battery.

When the battery charge is below 10%, the screen will emit a beeping sound when it is in use.

The battery can hold its charge for up to 3 months without use.

A fully charged battery will last about the following up/down cycles according to the size.
125” = 200 up/down cycles.
140” = 180 up/down cycles

RC1 Remote Kit – ZRC1-CKT-XY-F

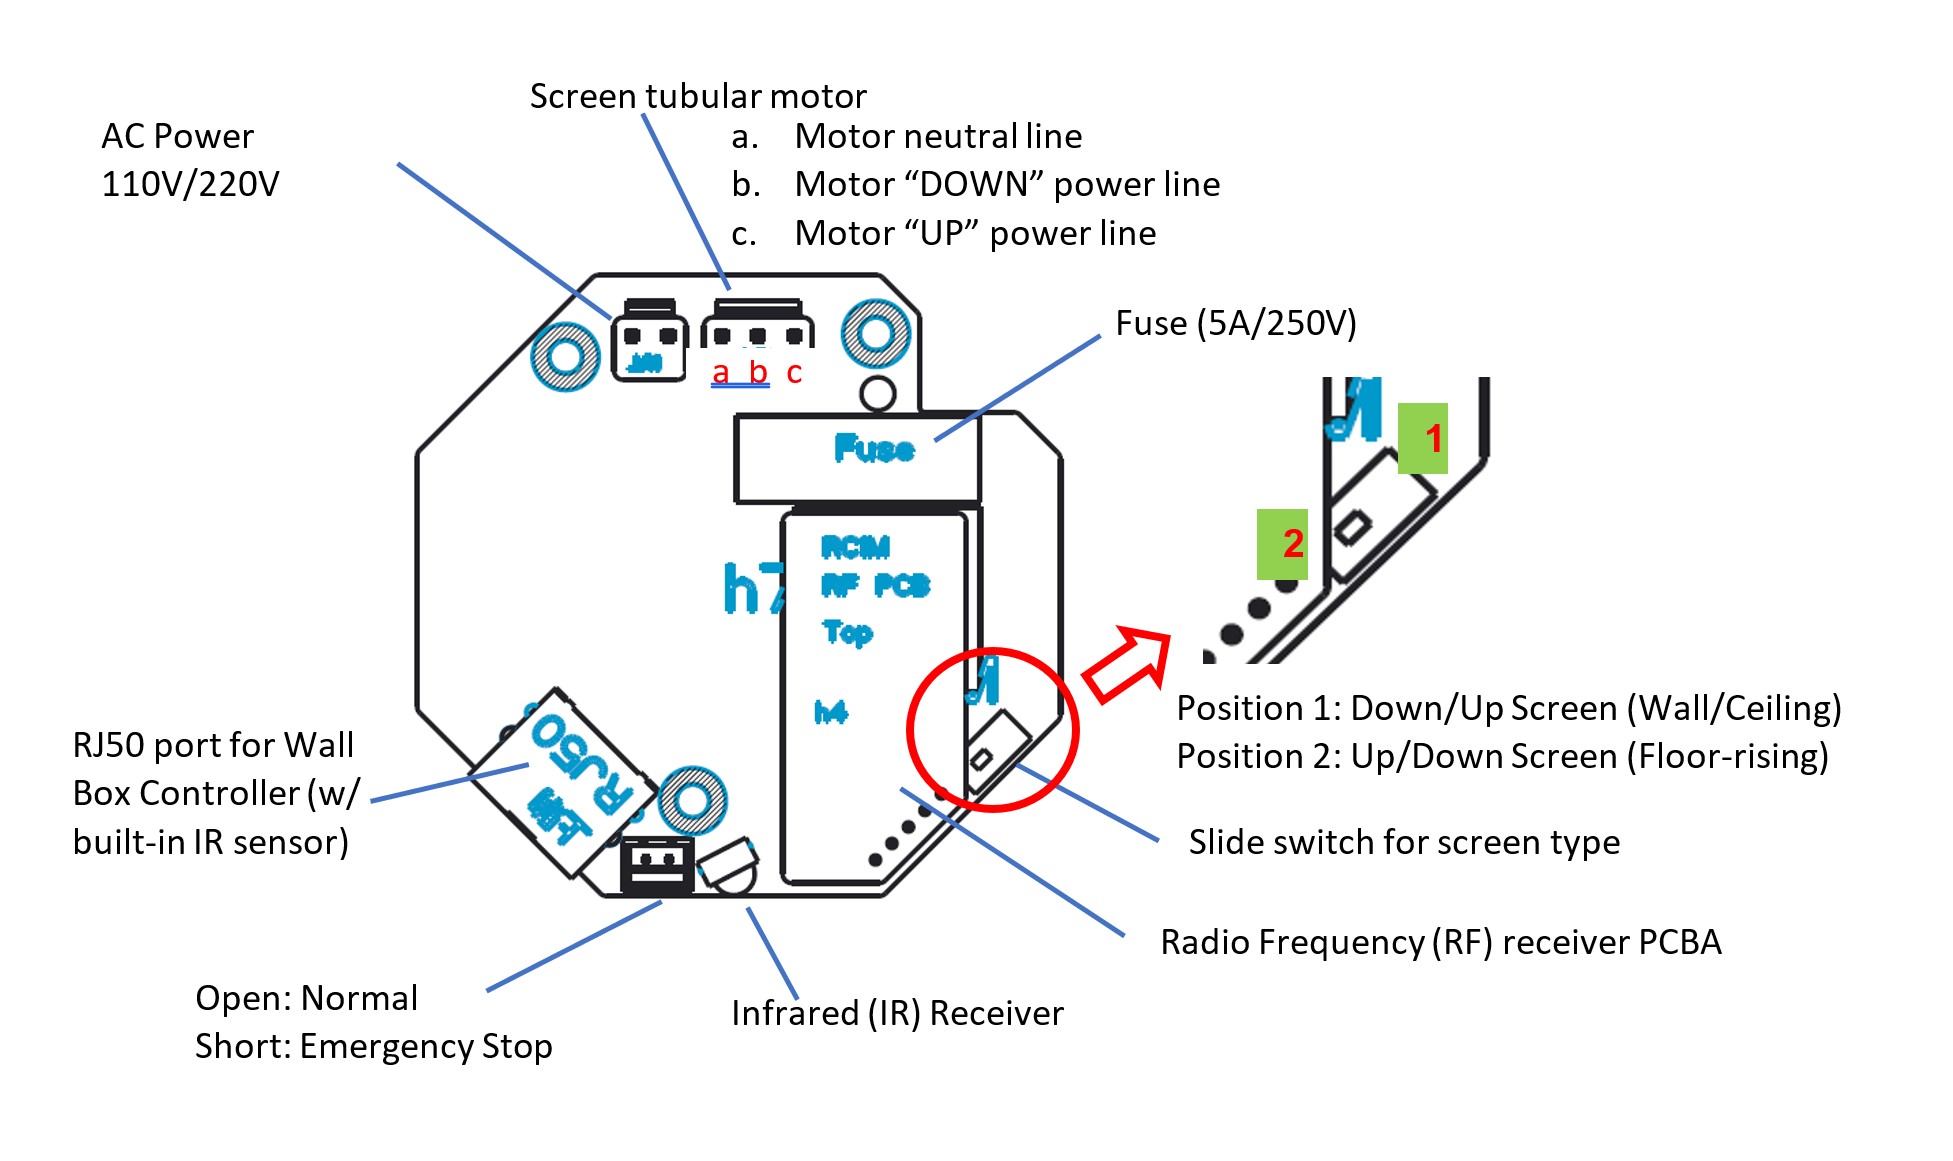
A: Please reference the circuit board layout below.

Circuit Board | ZRC1-CKT-X

ZRC1-CKT-X circuit board
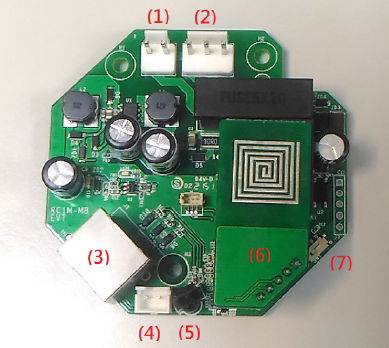
  1. Connection port for 110V AC Power
  2. Connection port for electric screen tubular motor
  3. RJ50 port for connecting wall box controller
  4. Emergency stopper
  5. Infrared signal receiver
  6. Radio Frequency signal receiver
  7. Switch for selecting screen type
    • Position 1 (Right) = Down/UP Retractable Wall/Ceiling Screen
    • Position 2 (Left) = Up/Down Retractable Floor Screen
ZRC1-CKT-X circuit board layout

A: The effective beam range 20 ft (6 M) within a 30° angle.

A: The exact radio frequency range of the ZRC1-RF is 433.93 MHz.

A: Follow the directions below to synchronize/pair a new ZRC1-RF remote.
Note: The wall box controller is needed for this operation.

  1. Press & hold the “Programming Key”, then press the “Up Key” on the Wall box controller (wall-box LED indicator light flashes).ZRC1-RF Radio Frequency (RF) remote and wall box controller
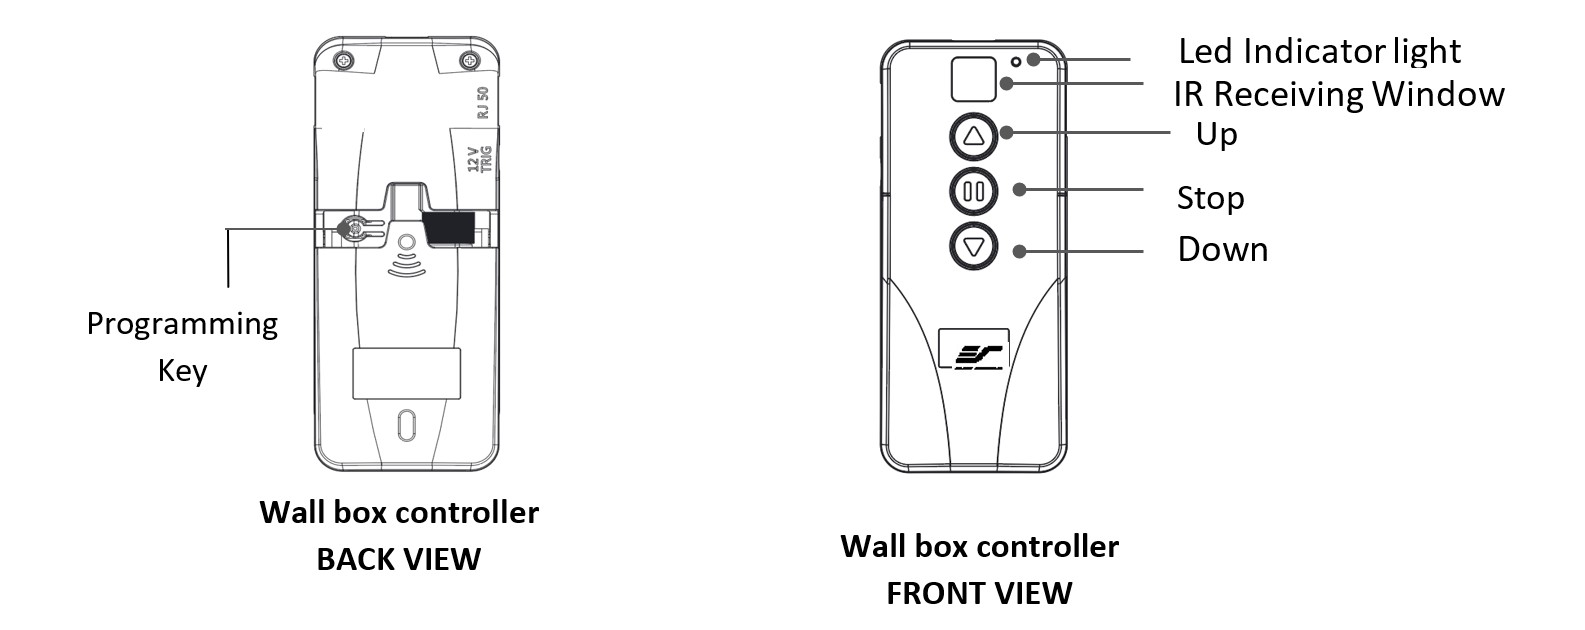
  2. Then press the “Up Key” on the RF remote
    ZRC1-RF Radio Frequency (RF) remote
  3. The Wall box LED indicator light will flash 5 times to indicate the RF remote has been properly synchronized/paired.

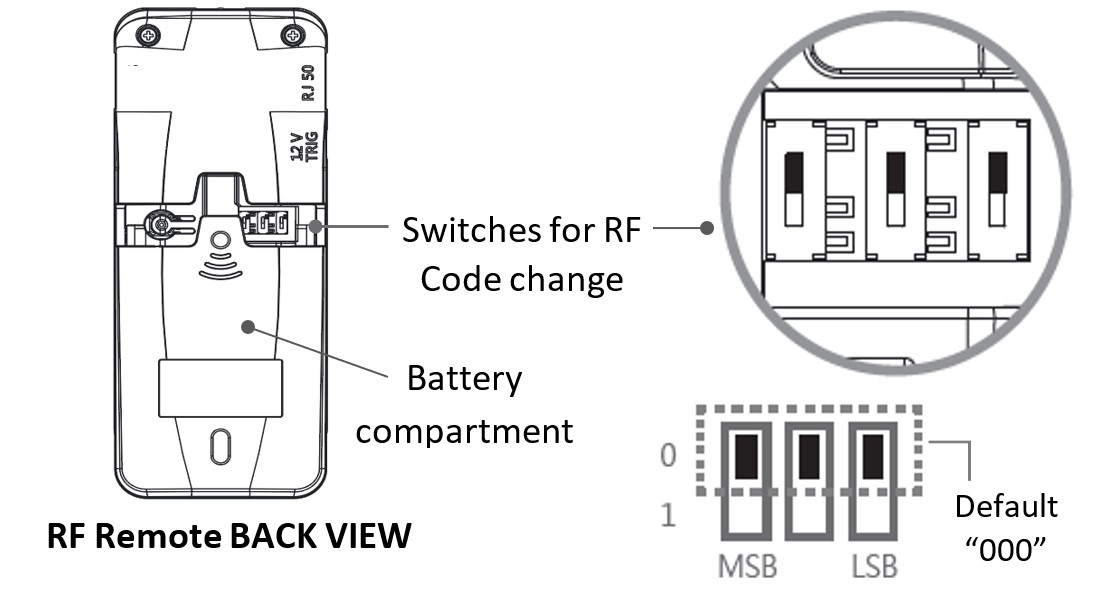
A: Yes, the ZRC1-RF Radio Frequency remote can be programmed with its own unique code to control multiple screens by changing the RF code as described below.

How to change the RF code

  1. Remove the batteries
  2. Change the RF code switch
  3. Insert the batteries
  4. Synchronize it with the wall box controller
RF Remote BACK VIEW

A: Yes, please follow the steps below to change the Radio Frequency code.

How to change the RF code

  1. Remove the batteries
  2. Change the RF code switch
  3. Insert the batteries
  4. Synchronize it with the wall box controller
RF Remote BACK VIEW

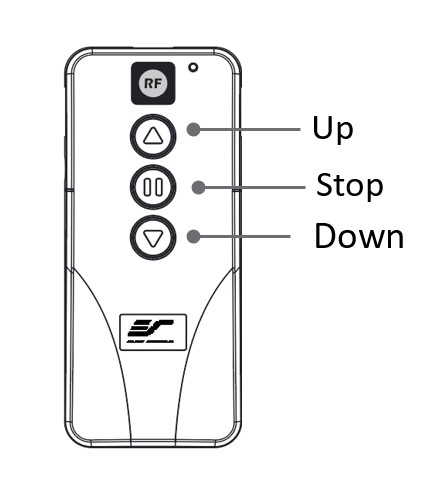
A: The ZRC1-IR codes are as follows.

  • UP_KEY = 0x07ED112B
  • STOP_KEY = 0x07F519C3
  • DOWN_KEY = 0x07DD089B

How to use the wireless 5-12 volt trigger feature

Requires a 3.5mm to 3.5mm mono cable (not included).
The Radio Frequency (RF) remote control serves as a dual purpose, independently as a handheld remote control, or as a Wireless 12-volt trigger. The radio frequency technology sends a wireless signal that synchronizes the screen’s drop & rise with the projector’s power cycle.

How to use the wireless 5-12 volt trigger feature

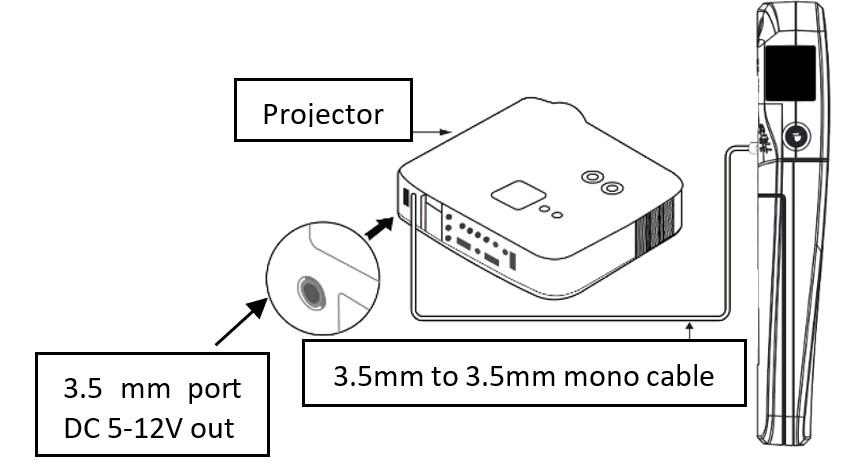
Step 1: Connect one end of the 3.5 mm mono trigger cable to the RF remote.
Step 2: Connect the other 3.5 mm mono end of the cable to projector.

  • Projector on, screen drops
  • Projector off, screen raises

Please be aware, the projector on/off cycle may take longer to fully activate. It usually takes around 20- 30seconds for full off and on cycle each time.

Note: If the wireless trigger feature does not work, please resync the RF remote to the Wall box controller per the instructions in the Radio Frequency remote section.